IN BRIEF:
Learn how to create or edit a class in iClassPro, covering all required and optional class setup tabs, outlining the various billing types, and describing how class billing and scheduling settings affect enrollment.
Interactive Demos for creating and editing classes can be found in the Education Corner, accessible from the Office Portal's "Welcome" screen. Full details are included in the "Class Setup: Prerequisite Settings" and "Class Setup: Creating a New Class" demos.
Prerequisite Settings
During the Class setup process, you will need to assign certain field values. Before you begin, refer to the following resources to ensure that these elements are properly configured:
- How Do I Create/Configure Programs?
- How Do I Create/Configure Levels?
- How Do I Create/Configure Tax Rates?
- How Do I Create/Configure Billing Schedules?
- How Do I Create/Configure Tuitions and Tuition Schedules?
Creating a New Class
- Navigate to the CLASSES page.
- Select New Class to open the setup window.
- The window will open on the DETAILS tab.
Details Tab
Required fields include:
- Class Name (manual or dynamic)
- Program (for income tracking)
- Minimum/Maximum Ages
- Maximum Students
- Gender Restrictions (if applicable)
Minimum/Maximum Age
-
Enter minimum and maximum ages. These can be defined as years, months, or days.
Years will reflect years in whole numbers
Months can be defined as "Any Months" or as a specific number of months (0-11).
If a specific number of months is selected, an option to define a number of Days (0-31) will also be displayed.
-
The system will use these values to determine student eligibility based on the student's age on the next class meeting date. Age restrictions are based on the student’s age as of the next class meeting date.
Defining a specific Year value will restrict enrollment for any students who have not yet reached that specific number of Years. For example, if 1 year is specifed, students who are less than a year old will be ineligible for the class. Students whose age is greater than or equal to 1 year will be eligible (subject to any Month/Day values that might also apply).
Defining a specific Month value will restrict enrollment for any students who have not yet reached that specific number of months past the defined Year value. For example, if 2 years, 6 Months is specifed, students who just turned two will be ineligible for the class. Students whose age is greater than or equal to 2 years, 6 Months will be eligible (subject to any Day value that might also apply).
Defining a specific Day value will restrict enrollment for any students who have not yet reached that specific number of days past the defined Year/Month values.
NOTE: the system will display eligible birthdate ranges based on your selections.
Autopilot Settings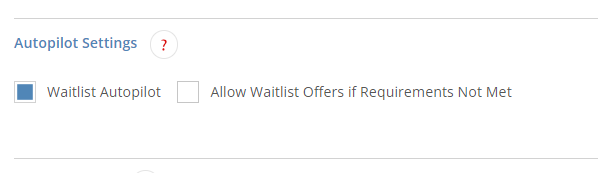
-
Waitlist Autopilot: Determines if the system should send waitlist offers when spots open.
- Allow Waitlist Offers if Requirements Not Met: If enabled, the system will send offers even if the student does not meet age/gender requirements for the class.
Note: The "Waitlist Management" Autopilot workflow must be enabled for these settings to take effect. Classes that disallow web registration or are marked "Punch Pass/Single Day Only" are excluded from waitlist automation.
Online Settings
- Show to Customers: Displays the class in the Customer Portal.
-
Hide Enrollments: Conceals current enrollment status.
- Important Note: Enabling this option also hides the class from being displayed in the makeup token redemption workflow.
- Allow Registration: Enables customer-initiated enrollments.
- Punch Pass/Single Day Only: Limits enrollments to Punch Pass redemption workflows only (Customer Portal/Mobile App/Kiosk).
NOTE: Customers with a direct link to a class will still to be able to enroll online if “Show on Web” is NOT enabled, but “Allow Registration” IS enabled. This means the class will not be displayed in the main Class listings and will only be accessible by families with a direct link.
Billing Tab
Go to the Billing Tab.
If you enable the "Non-Billable Class" option, you will be prompted to indicate whether enrollments in the class should be counted towards multi-student/multi-class discounts.
- For more information about disabling billing for classes, see our "How Do I Disable Billing For A Class?" document.
If the class is billable, leave the "Non-Billable Class" option disabled.
If the "Non-Billable Class" option is disabled, or if you will allow enrollments in the class to count towards discounts, you will use the Billing Wizard to set up the billing structure for your class.
The Billing Wizard walks you through setting up your class billing structure by answering questions about how you bill, how you want to handle discounts/proration, and other common billing questions.
- Click here for more information about Billing Schedules
- Click here for more information about Discounts
- Click here for more information about Proration
There are three billing options that can be selected to answer the question “How Do You Bill?”:
"Hourly" Billing
With Hourly billing, the class bills based on the number of hours a student is expected to attend (the actual amount charged depends on the duration of the class). To set up Hourly billing, answer the following questions:
- How often will you bill for the class? - This setting determines whether the total hours for the class will be calculated once per month/session or once per week for billing purposes.
- Once a month/session – totals the number of class hours in the billing cycle (month or session)
- Once a week – totals the number of class hours per week
- This class calculates prices by the number of hours in a…
- Month/Session – totals the number of class hours in a month/session when figuring price/discounts/proration
- Week – totals the number of class hours in a week when figuring price/discounts/proration, then sums them for monthly/session billing
-
NOTE: If the "Week" option is selected, the system will calculate classes based on a Monday-Sunday weekly period and will therefore include hours that may fall outside the billing date range to ensure that we properly apply discounts.
- However, only dates within the billing date range will actually be billed.
-
BILLING NOTE: If a student is enrolled in two "hourly" billing classes that meet on different days of the week, and the final week of the month has one class meeting in the first month and the second class meeting in the next, the system will always rank the second class as Class 2 for discount purposes even though both classes did not meet within the billing period. This is to ensure that the family is not overcharged/undercharged for their enrollments since the first class was already ranked Class 1 when billing for the first month.
- For example: A student has 2 enrollments in a week: enrollment A is on a Monday, enrollment B is on a Saturday. When billing for February 2025, in the month's final week (2/24/25 - 3/2/25) the system will bill the Monday class as Class 1. When billing for March 2025 (whose first week encompasses the same date range), the Saturday class will be billed as Class 2, since the system already charged the Monday class for this week as Class 1 for the final week in February.
-
NOTE: If the "Week" option is selected, the system will calculate classes based on a Monday-Sunday weekly period and will therefore include hours that may fall outside the billing date range to ensure that we properly apply discounts.
- Do you allow discounts?
NOTE: When using Hourly billing, the system will calculate the number of hours in the billing cycle and discount based on the total.- Yes
- Override discount schedule
- Check appropriate discount schedule (if enabled)
- No
- Override discount schedule
- Do you allow proration?
- Yes/No
- See our "How Does Proration Work?" document for more information about how iClassPro figures proration based on how your class is set up.
- Is this class tax exempt?
- Yes - selecting this option means that tuitions for this class ARE NOT subject to tax, even if a Tax Rate is assigned to the class Program.
- No - selecting this option means that tuitions for this class ARE subject to tax, and will be taxed at the Tax Rate based on your following choices.
- Override tax rate set on program
- If disabled, the system will charge the Tax Rate assigned to the class Program.
- If enabled, a "Check appropriate tax rate" option will be displayed.
- Select the appropriate Tax Rate from the "Choose Override" drop-down menu.
- Override tax rate set on program
- What is your billing schedule and tuition rate?
- Billing Schedule – select the appropriate billing schedule
- Tuition - select the appropriate tuition rate to be paired with the billing schedule
- Default – mark the selected billing schedule/tuition pair as the default for enrollments
- Add Another – click to add more billing schedule/tuition pairs
- Yes
"Time Slot" Billing
With Time Slot billing, the class bills based on the number of time slots the student is expected to attend (regardless of the duration of the class). To set up Time Slot billing, answer the following questions:
- This class calculates prices by the number of time slots in a…
- Month/Session – totals the number of time slots in a month/session when figuring price/discounts/proration
- Week – totals the number of time slots in a week when figuring price/discounts/proration, then sums them for monthly/session billing
-
NOTE: If the "Week" option is selected, the system will calculate classes based on a Monday-Sunday weekly period and will therefore include timeslots that may fall outside the billing date range to ensure that we properly apply discounts.
- However, only dates within the billing date range will actually be billed.
-
BILLING NOTE: If a student is enrolled in two "time slot" billing classes that meet on different days of the week, and the final week of the month has one class meeting in the first month and the second class meeting in the next, the system will always rank the second class as Class 2 for discount purposes even though both classes did not meet within the billing period. This is to ensure that the family is not overcharged/undercharged for their enrollments since the first class was already ranked Class 1 when billing for the first month.
- For example: A student has 2 enrollments in a week: enrollment A is on a Monday, enrollment B is on a Saturday. When billing for February 2025, in the month's final week (2/24/25 - 3/2/25) the system will bill the Monday class as Class 1. When billing for March 2025 (whose first week encompasses the same date range), the Saturday class will be billed as Class 2, since the system already charged the Monday class for this week as Class 1 for the final week in February.
-
NOTE: If the "Week" option is selected, the system will calculate classes based on a Monday-Sunday weekly period and will therefore include timeslots that may fall outside the billing date range to ensure that we properly apply discounts.
- Do you allow discounts?
NOTE: When using Time Slot billing, the system will calculate the number of class time slots in the billing cycle and discount based on the total.- Yes
- Override discount schedule
- Check appropriate discount schedule (if enabled)
- No
- Override discount schedule
- Do you allow proration?
- Yes/No
- See our "How Does Proration Work?" document for more information about how iClassPro figures proration based on how your class is set up.
- Is this class tax exempt?
- Yes
- No
- Override tax rate set on program
- Check appropriate tax rate (if enabled)
- Override tax rate set on program
- What is your billing schedule and tuition rate?
- Billing Schedule – select the appropriate billing schedule
- Tuition - select the appropriate tuition rate to be paired with the billing schedule
- Default – mark the selected billing schedule/tuition pair as the default for enrollments
- Add Another – click to add more billing schedule/tuition pairs
- Yes
If you are using timeslot billing calculated by the number of timeslots in a week, this may affect how students are ordered for discounts. See our "How Do I Set Up a Discount Schedule?" document for more information.
"Flat Rate" Billing
With Flat Rate billing, the class bills a flat amount per billing cycle. This is our “traditional” billing structure. To set up Flat Rate billing, answer the following questions:
- Do you allow discounts?
NOTE: When using Flat Rate billing, the system will count the number of enrollments the student has during the billing cycle and discount based on the total.- Yes
- Override discount schedule
- Check appropriate discount schedule (if enabled)
- No
- Override discount schedule
- Do you allow proration?
- Yes/No
- See our "How Does Proration Work?" document for more information about how iClassPro figures proration based on how your class is set up.
- Is this class tax exempt?
- Yes
- No
- Override tax rate set on program
- Check appropriate tax rate (if enabled)
- Override tax rate set on program
- What is your billing schedule and tuition rate?
- Billing Schedule – select the appropriate billing schedule
- Tuition - select the appropriate tuition rate to be paired with the billing schedule
- Default – mark the selected billing schedule/tuition pair as the default for enrollments
- Add Another – click to add more billing schedule/tuition pairs
- Yes
Click here for more information about hourly billing.
Click here for more information about setting up Discount Schedules.
How Class Bill Dates Work
The Bill Dates tab will allow you to choose Sessions or Rolling Sessions which indicate the length of time billing is assessed over and control re-enrollment.
Classes must use one of the following bill date options:
This Class Bills Monthly:
- Continuous enrollment billed by calendar month.
- Use Start/End Dates to restrict Customer Portal selections.
- Registration Dates and Priority Registration Dates control visibility.
- Global Priority settings override class-level values.

This Class Bills According to Custom Date Ranges - Rolling Sessions (Keep students enrolled after session ends)
- Billed based on the length of the Rolling Session (e.g., every 6 weeks).
- Enrollments have a defined start date, but no end date, and do not require re-enrollment.
This Class Bills According to Custom Date Ranges - Sessions (Drop students after session ends)
- Billed based on the length of the Session (e.g., every 6 weeks).
- Enrollments have defined start and end dates and require re-enrollment.
NOTE: Changing billing types requires creating a new class and transferring enrollments. (For full details, see our "How Do I Duplicate a Class?" document.)
Schedule Tab

- This is a required field.
- Add the day(s)/time(s) when the class meets.

- Select the Day of the week.
- Define the class Start Time.
- Assign the Duration. Be sure to enter "0" for the hour if the class lasts less than 60 minutes.
- Click ADD TIME SLOT to assign the timeslot to the schedule.
NOTE: Students enrolled in the class are expected to attend all listed days/times the class meets. All meeting periods are included when figuring billing and attendance.
To allow for more flexible scheduling, create a separate class for each meeting day/time.
Other Tabs
Instructor Tab
- Assign coaches/instructors.
- The system displays up to 100 instructors at a time with the ability to search if needed.
Keywords Tab
- Attach keywords for filtering reports.
Notes Tab
- Include internal notes that can be accessed through the Office/Staff Portal or via the Class Notes Report (CLA-19).
- NOTE: Notes cannot be added until after the class has been saved/created.
Promo Codes Tab
- Restrict usable promotion codes per class.
- NOTE: Promo Codes cannot be attached until after the class has been saved/created.
Skill Tree Tab
- Override the skill tree inherited from the Program.
Custom Fields Tab
- Add information via internal-use custom fields.
Auto-Approval Tab
- Customize auto-approval settings per class.
- NOTE: For more information about how Auto-Approval prerequisites work, see our “How Do the Class/Camp ‘Auto-Approval’ Criteria Work?” document.
After entering all of the required data, be sure to save your work.
Editing an Existing Class
To edit an existing class, navigate to the CLASSES page and click the pencil/edit icon to the left of the class you wish to edit.
After making any necessary changes, be sure to save your work.
Editing the schedule
Note that editing the class schedule will affect how records for the class are displayed historically. To maintain accurate historical reporting, we recommend taking the following steps if you need to change the class schedule:
- Duplicate the class
- Transfer enrollments to the new class
- Make the original class inactive to preserve reporting
Important Notes
- If you are changing the status of a class from ACTIVE to INACTIVE, you will be prompted to assign a drop date for any current enrollments. Any future enrollments or Waitlist enrollments will be dropped.
- For the purposes of enrollment history, iClassPro does not track historical updates to the class itself (although it does retain some data in the financial records). When updating the Program on an existing class, in order to maintain accurate historical data we recommend duplicating the current class, making the necessary changes on the new class, then transferring enrollments to the new class and making the original class Inactive.
- If you attempt to manually change the tuition associated with a billing schedule, the system will display a warning as follows:
-
You are about to update the tuition for this billing schedule. Any current or future enrollments using this billing schedule will use this new tuition amount for new charges.
- You will need to click OK to continue or have the option to CANCEL.
-
You are about to update the tuition for this billing schedule. Any current or future enrollments using this billing schedule will use this new tuition amount for new charges.
- If you attempt to remove a billing schedule manually, the system will present a warning if any current or future ACTIVE or SINGLE DAY enrollments are still associated with the billing schedule via billing schedule override. You will be unable to remove the billing schedule until these enrollments have been edited to remove or change the billing schedule override.
- You can find enrollments linked to specific billing schedules by running the Student List Report (STU-1) and using the "Class Filters" option to filter by Billing Schedule.
- If you attempt to change the default billing schedule for a class, the system will display a warning similar to the one below (verbiage may differ based on different scenarios):
-
Any existing enrollments using the current class default will use this new default billing schedule and tuition amount moving forward unless they have a billing schedule override in place.
- You will need to choose from one of the following three options:
- Continue - acknowledges the warning and changes the default billing schedule. You may need to manually update enrollments if they need to have a billing schedule override assigned.
- Cancel - Will cancel the task and return to whichever window launched the task.
- Override Billing Schedule for current enrollments - If this option is selected, the system will automatically assign a billing schedule override to any current enrollments attached to the original default billing schedule that do not already have a billing schedule override assigned, then update the default billing schedule on the class. Any new enrollments created will use the new default billing schedule.
- You will need to choose from one of the following three options:
-
Any existing enrollments using the current class default will use this new default billing schedule and tuition amount moving forward unless they have a billing schedule override in place.
-
If the class only has ONE billing schedule attached and that billing schedule is simply changed to a different one, the system will display a warning similar to the one below (verbiage may differ based on different scenarios):
-
You are about to update the billing schedule for this class. Any current or future enrollments using this billing schedule will use the new billing schedule for new charges. Choosing to "Override Billing Schedule for current enrollments" will create an additional billing schedule/tuition pair on this class if one does not exist to match the original billing schedule being replaced.
- You will need to click OK to continue or have the option to CANCEL.
-
You are about to update the billing schedule for this class. Any current or future enrollments using this billing schedule will use the new billing schedule for new charges. Choosing to "Override Billing Schedule for current enrollments" will create an additional billing schedule/tuition pair on this class if one does not exist to match the original billing schedule being replaced.
- If you are assigning the Class to a specified Zone that would result in overbooking the Zone, the system will display a warning.