IN BRIEF
This article explains how to process payments in iClassPro using stored payment information (autopay). It also covers how to use the Payments task under TRANSACTIONS>PAYMENTS to apply credits or collect payments for multiple customers at once.
- Overview
- Accessing the Feature
- Step-by-Step Instructions
- Record Keeping
- Troubleshooting & FAQs
- Related Articles
Overview
Processing payments from stored payment information allows businesses to collect outstanding balances efficiently. You can process a single payment manually or run the Payments task to handle multiple accounts at once.
iClassPro supports two bulk tasks for managing stored payment data:
- Apply Credits and Unapplied Payments – applies existing account credit to open charges before collecting new payments.
- Charge from Merchant Accounts – charges stored credit card or eCheck information that is authorized for recurring billing for outstanding balances.
Running these tasks helps maintain accurate ledgers and streamline billing.
Accessing the Feature
- In the Office Portal, navigate to TRANSACTIONS>PAYMENTS.
- Select the desired "Auto Payment" task to begin processing payments or applying credits.
Step-by-Step Instructions
Processing a Single Payment using stored payment information
- From the FAMILIES or STUDENTS page, click on the currency icon to open the family’s Ledger.
- Select New Payment.
- Choose the first payment type listed — either eCheck on File or Credit Card on File.
- Complete the payment entry as needed.
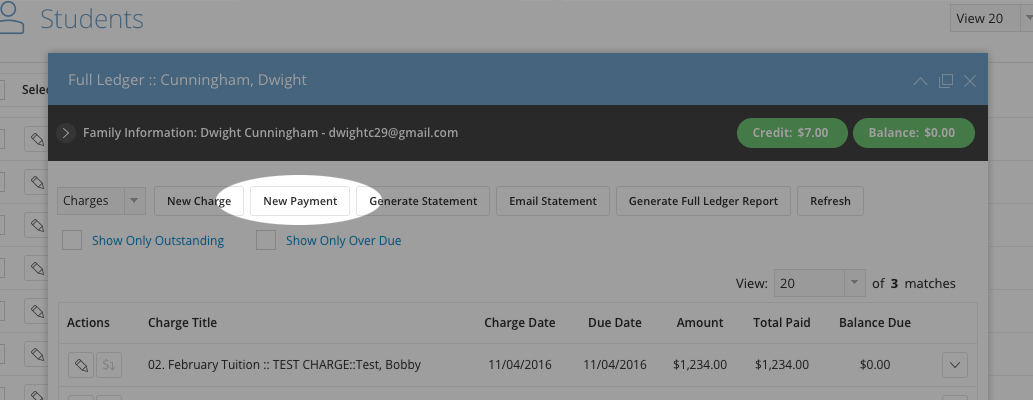
NOTE: the option to make a payment using the “Credit Card on File” type will be disabled if the saved payment method is flagged as Invalid.
Processing Bulk Payments (or Apply Credit in Bulk)
Account-wide billing tasks are performed from the TRANSACTIONS page in iClassPro. For best results, refer to the Billing Operations Checklist to ensure a smooth process for staff and customers.
What is the Payments task?
Two main tasks can be run under Transactions > Payments:
-
Apply Credits and Unapplied Payments
- Finds all customers with both open charges and unused account credits.
- Applies the available credits to reduce outstanding balances.
- Recommended to run before “Charge from Merchant Account” to prevent overbilling.
-
Charge from Merchant Account
- Charges stored payment methods (credit card or eCheck) that are authorized for recurring billing for customers with outstanding balances.
- Only processes payments for the Primary Guardian’s Primary payment method.
- If no primary payment method exists, the family is excluded from autopay.
Filter options let you refine which customers are included using:
- Charge Categories
-
Family Status
- All considers all families with outstanding charges, regardless of their enrollment status.
- Active only considers families with outstanding charges that have an active enrollment on the date the task is run.
- Inactive only considers families with outstanding charges that do not have an active enrollment on the date the task is run.
- Charge Due Dates (Bill Filter)
- Minimum Balances
- Line Item Types
- Keywords
NOTE: “Charge from Merchant Account” always attempts to collect the full outstanding balance, regardless of account credits. Always run the Apply Credits task first to prevent overbilling.
How the Filters Work
Processing by Charge Category
You can restrict payments to specific Charge Categories, such as “August Tuition” or “Team Uniforms.”
- Select one or more Charge Categories from the drop-down list.
- Use Select All to include every category.
- Toggle "Expired" if you need to collect from Charge Categories that are no longer active.
Bill Filter
Use the Bill filter to limit processing based on charge due dates:
- Due On or Before a specific date (date field below).
- Due On a specific date (date field below).
- All Outstanding Charges (no date field).
For example:
- Due On or Before a specific date will collect for charges with a due date equal to or prior to that date.
- Due On a specific date will only collect for charges with a due date equal to that date, and will ignore charges with any other due date.
- All Outstanding Charges will collect for any outstanding charges that meet other criteria (such as line item type or Charge Category), regardless of the due date.
Line Item Types
Choose which line item types to include:
- Class Tuition
- Camp Tuition
- Parties
- Anniversary
- Other
Selecting specific Line Item Types helps prevent billing for items outside your billing policy.
Running the Payments Task
To collect bulk payments from stored payment information:
- Navigate to TRANSACTIONS>PAYMENTS.
- Select your Auto Payments Task. (We highly recommend running the Apply Credits task first before using the other two options.)
-
(Optional) Choose one or more Charge Categories to restrict the payments process task to only those charges. Use the "Select All" option to not restrict the search to specific charges. (NOTE: If you need to collect payments for Charge Categories that have expired, you will need to toggle the "Expired" switch on the Charge Category drop-down menu.)
- Select whether to process payments for Active, Inactive or All family accounts using the Family Status filter.
- Select the Bill option that will best fit the intentions of the payments process task. If requested, enter the Due Date in the field below.
- Enter a Minimum Payment Amount to be eligible for the payments process task (some businesses do not draft for outstanding charges below a certain amount to minimize the impact of processing fees).
- Choose the Charge Types to process payments for (Class Tuition, Camp Tuition, Parties, Anniversary, and Other).
- (Optional) Select Family or Student Keywords to restrict the individuals eligible to be included in the payments process task. Accounts linked to any one or more of the selected keywords will be shown in the preview.
-
(Optional) If you have chosen the "Charge From Merchant Account" Auto Payments Task, you can enable the following option(s):
- Email Receipts For Successful Payments - if enabled, the system will send a receipt to the family's primary email address when a successful payment is processed. (This email can be customized under SETTINGS>SETUP>GENERAL SETTINGS>EMAIL TEMPLATES>ICLASSPRO>Autopay Receipt.)
- Email Failed Payment Notifications - if enabled, the system will send an email to the family's primary email address when a payment is declined. (This email can be customized under SETTINGS>SETUP>GENERAL SETTINGS>EMAIL TEMPLATES>ICLASSPRO>Autopay Declined.)
- Click Preview. The preview will generate in your background tasks for safe keeping but should open automatically if you do not navigate away from the page.
- At the top of the preview, is a Filter Summary. Click Show to review all filters from the previous page.
- Review the customers that meet the qualifications to have their payments processed. Families with a box highlighted in blue will have a payment processed using the saved payment information on file. If you make corrections to accounts, you must run a new preview to see the changes.
- The system will display a red warning in the Payment Preview screen if the payment type is flagged as Invalid, and the payment will not be processed.
- When you are ready, click Process.
Processing payments can take some time. You can review the progress of the task in your background task.
Record Keeping
Once complete, the task status will read "Done" and a down arrow will appear next to the task.
Clicking the down arrow will take you to a summary page of all payments that were attempted to be processed and the filters used for the preview. Failed attempts to process will be listed with an error message detailing why the payment failed.
The Payments Process result will include the following columns:
- Family
- Type
- CC_MERCHANT
- ECHECK
- Payment Status
The results can be searched by any of these terms.
To save this information, click Save to CSV. This document will also generate in your background tasks. Once complete, click on the document icon or down arrow to save the file for your records.
Troubleshooting & FAQs
-
Why can’t I access the TRANSACTIONS > PAYMENTS page?
- Accessing the TRANSACTIONS page requires that you have been granted permission to do so. If you cannot access the page, contact your administrator to verify your staff permissions.
-
Why didn’t a payment process for a family?
- The family might not have a valid “Primary” payment method or the stored method is flagged as Invalid.
- Ensure that the "Primary" payment method associated with the primary guardian is authorized for recurring billing.
- Ensure that the family's enrollment status on the day the task was run meets the selected "Family Status" criteria.
-
How can I verify which payments were declined?
- Check the “Payments Process” summary. Declined payments include error messages explaining why they failed.